How to disable password expiration for the administrator in SAP Configtool?

How to disable password expiration for the Administrator in SAP Configtool?


The password of the user expire each 90 days per default.
This deadline could be removed.


Log on with <sid>adm user

Start the configtool
# cd /usr/sap/YT1/JC00/j2ee/configtool/
# ./configtool.sh

 Click on "Yes"

Expand the menu:
Cluster-data -> Global server configuration -> services -> com.sap.security.core.ume.service
Select the parameter ""ume.logon.security_policy.password_expire_days"

Change the value of the parameter "ume.logon.security_policy.password_expire_days" from 90 to 0
Click on "Set Custom Value"
Click on "Save"


 Click on "OK"

Restart the instance to apply the modification

SAP HANA: drop Tenant Database

SAP HANA: drop Tenant Database


Note:
The use of this statement requires the DATABASE ADMIN privilege.


Log on to the SYSTEMDB  tenant with the <sid>adm user
ardbhp201:/ # su - bhpadm

Connect to the HDBSQL
ardbhp201:/usr/sap/BHP/HDB40> hdbsql -i 40 -d SystemDB -u SYSTEM -p <password>

Stop the tenant database
hdbsql SYSTEMDB=> ALTER SYSTEM STOP DATABASE NM2

Drop the tenant database
hdbsql SYSTEMDB=> drop database NM2

ICM: Binding ports < 1024 on UNIX

ICM: Binding ports < 1024 on UNIX


SAP notes

Refer to the following SAP notes:
  • 2354759 - Service not started in host <hostname/IP address>:<port> -- NIEMYHOST_VERIFY
  • 421359 - ICM: Binding ports < 1024 on UNIX

Cause

The SAP Web Dispatcher is configured with the port 443
alemavt06:wd1adm 89> grep icm/server WD1_W03_alemavt06
icm/server_port_0 = PROT=HTTPS,PORT=443

During the start of the SAP Web Dispatcher, the following error appears
alemavt06:wd1adm 73> tail -f dev_webdisp
...
[Thr 139928454227712] *** ERROR => NiIBindSocket: SiBind failed for hdl 25/sock 10
    (SI_EADDR_NAVAIL/13; I4; ST; 0.0.0.0:443) [nixxi.cpp    3831]
[Thr 139928454227712] *** ERROR => IcmBindService: You might not have the permissions to bind the service: alemavt06.alema.local:443 [icxxserv.c   3817]
[Thr 139928454227712] *** ERROR => IcmBindService: NiBuf2Listen failed for host alemavt06.alema.local:443 (rc=-16): NIEMYHOST_VERIFY [icxxserv.c   3822]
[Thr 139928454227712] *** WARNING => IcmAddService: Could not start service (rc=-1) PORT=443,PROT=HTTPS,TIMEOUT=60,PROCTIMEOUT=60,VCLIENT=1 [icxxserv.c   1311]
[Thr 139928454227712] IcmAddHiddenService: Hidden service WEBSOCKET started
[Thr 139928454227712] Started service PORT=8003,PROT=HTTP,TIMEOUT=60,PROCTIMEOUT=60

The SAP Web Dispatcher user cannot bind the port 443 because the process on Unix must have superuser authorization rights.

Procedure


Log on with the root user

Go inside SAP executable directory (CDEXE)
alemavt06:/usr/sap # cd /sapmnt/WD1/exe/uc/linuxx86_64

Check the existence of the binary "icmbnd.new"
alemavt06:/sapmnt/WD1/exe/uc/linuxx86_64 # ls -l | grep icmbnd
-rwxr-xr-x 1 wd1adm sapsys  2256990 Feb  6 20:28 icmbnd.new

Copy the binary from "icmbnd.new" to "icmbnd"
alemavt06:/sapmnt/WD1/exe/uc/linuxx86_64 # cp icmbnd.new icmbnd

Adapt the authorization of "icmbnd"
alemavt06:/sapmnt/WD1/exe/uc/linuxx86_64 # chown root:sapsys icmbnd
alemavt06:/sapmnt/WD1/exe/uc/linuxx86_64 # chmod 4750 icmbnd

Check the new authorizations for "icmbnd"
alemavt06:/sapmnt/WD1/exe/uc/linuxx86_64 # ls -l | grep icmbnd
-rwsr-x--- 1 root   sapsys  2256990 Mar  6 13:59 icmbnd
-rwxr-xr-x 1 wd1adm sapsys  2256990 Feb  6 20:28 icmbnd.new

To prevent the ICM/SAP Web Dispatcher from attempting to bind the port itself, an additional option must be specified when the ports are configured with icm/server_port_: "EXTBIND=1".
alemavt06:wd1adm 91> grep icm/server WD1_W03_alemavt06
icm/server_port_0 = PROT=HTTPS,PORT=443, TIMEOUT=15, EXTBIND=1


Restart the SAP Web Dispatcher
alemavt06:wd1adm 92> stopsap ; startsap

Check the log
alemavt06:wd1adm 58> view dev_webdisp
...
[Thr 139773473732480] Started service PORT=443,PROT=HTTPS,TIMEOUT=15,PROCTIMEOUT=15,EXTBIND=1,VCLIENT=1
[Thr 139773473732480] SSL settings: verify_client: 1, cache_size: -1, cache_lifetime: -1, credfile: SAPSSLS.pse, ciphers: default
[Thr 139773235496704] IcmAddHiddenService: Hidden service WEBSOCKET started

Upgrade of SAP Netweaver 7.3 EHP1 JAVA (SP application)

Upgrade of SAP Netweaver 7.3 EHP1 JAVA (SP application)


This guide explains how to apply Support Packages for a SAP Netweaver 7.3 EHP1 JAVA.

Prerequisite

The system SAP Netweaver 7.3 EHP1 JAVA is installed and configured.
Refer to the related documentation:

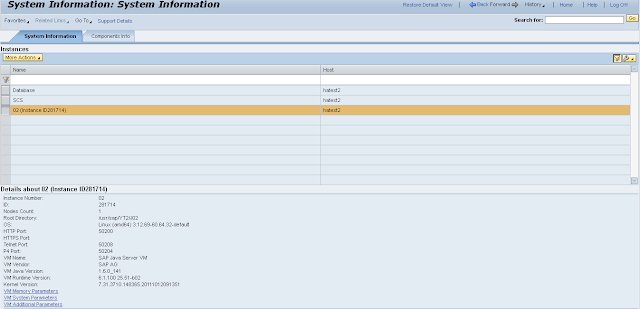
Check the current version of your SAP System by running the URL: http://<hostanme>:<port>/monitoring/SystemInfo


Note the version of the Database, kernel...
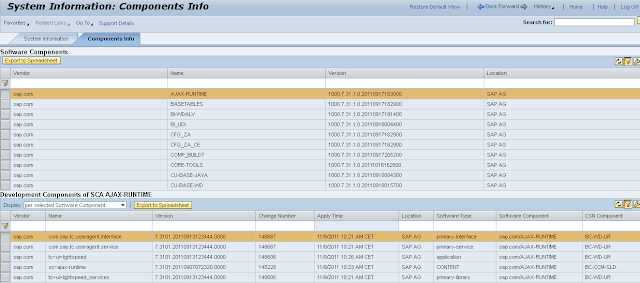
Go into the "Components Info" tab


Note the version of the Software Components (in my case, the SCs are in version 7.31 SP1)


Call the Product Availability Matrix (PAM): https://support.sap.com/release-upgrade-maintenance/pam.html

Choose the product: SAP EHP1 FOR SAP NETWEAVER 7.3


Select: General information -> Support Package Stacks
Check the latest available Support Package Stack and read the associated SAP note


Generation of the XML stack


The generation of the XML stack is done in the Maintenance Planner: https://support.sap.com/release-upgrade-maintenance.html


This step is described in the article Installation of SAP Netweaver 7.3 EHP1 JAVA


Download of the Certificate Revocation List (CRL)

Open the URL into a browser: https://tcs.mysap.com/crl/crlbag.p7s
 
Download the Certificate Revocation List (CRL)

Place it in the download directory (so that SUM also checks the archive certificates)
# ls -lrt /sources/SAP_NW_731_UPG/crlbag.p7s
-rw-r--r-- 1 root root 1159 Feb 23 23:19 /sources/SAP_NW_731_UPG/crlbag.p7s


Extraction of the SUM

Create a File System dedicated for the SUM

In my case, I created a link due to a lack of space with <sid>adm user
# mkdir -p /sources/SUM
# chown yt2adm:sapsys /sources/SUM
# cd /usr/sap/YT2
# ln -s /sources/SUM SUM

Extract the SUM with <sid>adm user
# cd /usr/sap/YT2
# SAPCAR -xvf /sources/SAP_NW_731_UPG/SUM10SP19_0-20006543.SAR

Register SUM/SAPHostagent with root user
# cd /usr/sap/YT2/SUM
# ./STARTUP confighostagent YT2
**** HOST detected as hatest2
**** The root directory to SUM is /usr/sap/YT2/SUM
**** The SUM has been extracted for SAP system YT2 as /usr/sap/YT2/SUM
**** SID parameter YT2 as points to a valid SAP system
**** Given SID parameter YT2 matches calculated SID from SUM path /usr/sap/YT2/SUM
**** The saphostagent command would be /usr/sap/YT2/SUM/sdt/exe/SLProtocol.sh
**** Set root:sapsys as owner of /usr/sap/hostctrl/exe/operations.d and /usr/sap/hostctrl/exe/descriptors.d
**** Set root user and root group as owner of files in /usr/sap/hostctrl/exe/operations.d and /usr/sap/hostctrl/exe/descriptors.d
**** Configuring SUM Abap:  /usr/sap/YT2/SUM/abap/SUMSTART confighostagent RESTARTSHA=no  ****
**** SUM ABAP: https://hatest2:1129/lmsl/sumabap/YT2/doc/sluigui ****
**** SUM benchmark tool: https://hatest2:1129/lmsl/migtool/YT2/doc/sluigui ****
**** SUM Java: https://hatest2:1129/lmsl/sumjava/YT2/index.html ****
**** SUM Dual stack: https://hatest2:1129/lmsl/sumjava/YT2/dual.html ****
**** SUM Observer: https://hatest2:1129/lmsl/sumobserver/YT2/monitor/index.html ****
**** Restarting SAP Host Agent ****

saphostexec is already running (pid=2394). Stopping...-> Start /usr/sap/hostctrl/exe/saphostexec pf=/usr/sap/hostctrl/exe/host_profile <-
start hostcontrol using profile /usr/sap/hostctrl/exe/host_profile
**** SAP Host Agent has been restarted ****
**** You are using SAP Host Agent version: ****
**** hostagent release: 7.21 ****
**** hostagent patch number: 24 ****
**** Please check the central SUM note and its dependent platform specific SUM note ****
**** whether this SAP Host Agent version is sufficient for SUM operation ****


Execution of the SUM


Open a browser and enter the URL: http://<hostname>:1128/lmsl/sumjava/<SID>/index.html


Enter the credentials for the <sid>adm user
Click on "Log In"


Click on "Next"

Enter the authentication mechanism
Click on "Next"


Enter the path of the XML stack file
Click on "Next"


Click on "Next"

Provide the user credentials
Click on "Next"


Click on "Next"

Click on "Next"

Click on "Next"
Wait until the end of the deploiement

Click on "Next"

Click on "Next"

Click on "Close"
Click on "Finish"

Click on "Confirm"


Enter the URL: http://<hostname>:5<xx>00/monitoring/ComponentInfo


Check again the version of the Software Components (version 7.31 SP19 in my case)

Installation of SAP Netweaver 7.3 EHP1 JAVA

Installation of SAP Netweaver 7.3 EHP1 JAVA


This article describes how to install an SAP system based on the application server Java of SAP NetWeaver with the required Support Package stack in one implementation run.

In our case, we will be in the below version combination:
  • Operating system: SUSE Linux Enterprise Server 12 SP1
  • Database: Oracle Database 11.2.0.4
  • SAP version: SAP NW 7.3 EHP1 (JAVA)
  • SAP kernel: 722_EXT_REL

Refer to the following SAP documentation for more information:
https://help.sap.com/nw731


Preparation


Product Availability Matrix

First of all, check the supported combinations of operating systems and database systems for the choosen SAP system installation.

Link to explain how to navigate into the PAM


Connect to the SAP Marketplace: https://launchpad.support.sap.com

Click on the "Product Availability Matrix" (PAM) tile
Find the SAP system to be installed (SAP EHP1 FOR SAP NETWEAVER 7.3)

Go into: Technical Release information -> Database Platforms
Select the following options:
- Product instance: Application Server Java
- Database: ORACLE 64-BIT
- Operating System: LINUX ON X86_64
Validate that is a SAP supported combination

Go into: General information -> Support Package Stacks
Check the lastest version stack available (SP19 for SAP NW 7.31 JAVA in our case)

Hardware and Software requirements

Ensure that your hosts meet the hardware and software requirements for your operating system and the SAP instances. Otherwise you might experience problems when working with the SAP system.

You will find these information into the installation guides located into https://help.sap.com/nw731


Operating system installation


This part is not yet available.


Installation Media list 

Link to explain how to download DVD

DVD number Label
51043228 NW 7.31 Java
51049326 ORACLE Client 11.2.0.4 V3
51047701Oracle 11.2.0.4 RDBMS Linux on x86_64 64bit
SWPM10SP19_0-20009701.SAR SWPM 1.0 SP19 for NW higher than 7.0x


XML Stack generation


If you want to install an SAP Java system along with the required Support Package stack in one
implementation run, you need to plan the desired installation target using the maintenance planner at
https://apps.support.sap.com/sap/support/mp

Open the Maintenance Planner: https://apps.support.sap.com/sap/support/mp

Select the tile "Plan a New System"

Select "Plan"

Choose "JAVA (install a JAVA system)"

Enter the SAP SID
Select: Install an SAP NETWEAVER system -> SAP EHP1 FOR SAP NETWEAVER 7.3
Find the latest of Support Package available
Crosscheck the component that you want to install (example: EP Core, Enterprise Portal...)

Click on "Next"

Select the OS/DB files for your Operating System (Linux on x86_64 64 bit in our case)
Click on "Confirm Selection"

Click on "Add Java Patches"

Select all Java patches
Click on "OK"

Click on "Next"

Download the Stack XML
Click on "Push to Download Basket"

Download all packages
Transfer its to the server

SAP Installation


Execute the SWPM by calling it with parameter SAPINST_STACK_XML=<Absolute_Path_To_Stack_XML_File>
# cd /sources/SAP_NW_731_INST/SWPM
# ./sapinst SAPINST_STACK_XML=/sources/SAP_NW_731_UPG/MP_Stack_1000168047_20170227_.xml


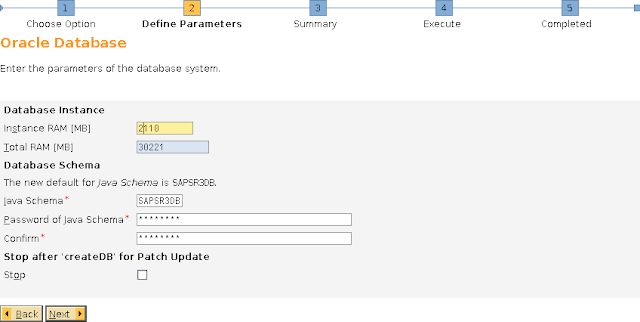
Install the Oracle Database
Refer to the article Installation of Oracle Database 11.2.0.4


Check the system information by entering the URL: http://<hostname>:5<xx>00/nwa/sysinfo

Select the "Components Info" tab
Check the version of the JAVA Software Components

Support Package upgrade


Apply the Java patches: